
In this tutorial we will learn How to use RadioButton in Android Using Android Studio.
Generally we use RadioButtons when we want to choose from a list of items. For Example we want to give the option to the user to select his/her favorite animal, in this case we can use RadioButtons to give those options.
So lets create a project.
Step 1 – Create new Android project
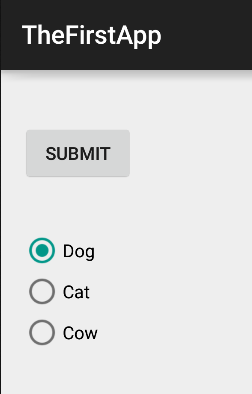
Step 2 – Add three RadioButton in the main activity. Also Add a button to the main activity as shown in the picture below.
layout/activity_main.xml
<RelativeLayout xmlns:android="http://schemas.android.com/apk/res/android"
    xmlns:tools="http://schemas.android.com/tools" android:layout_width="match_parent"
    android:layout_height="match_parent" android:paddingLeft="@dimen/activity_horizontal_margin"
    android:paddingRight="@dimen/activity_horizontal_margin"
    android:paddingTop="@dimen/activity_vertical_margin"
    android:paddingBottom="@dimen/activity_vertical_margin" tools:context=".MainActivity"
    android:id="@+id/abc">

    <RadioGroup
        android:layout_width="wrap_content"
        android:layout_height="wrap_content"
        android:layout_marginTop="36dp"
        android:layout_below="@+id/button"
        android:layout_alignParentLeft="true"
        android:layout_alignParentStart="true"
        android:id="@+id/rg_animals">

        <RadioButton
            android:layout_width="wrap_content"
            android:layout_height="wrap_content"
            android:text="Dog"
            android:id="@+id/radioButton_dog"
            android:checked="false" />

        <RadioButton
            android:layout_width="wrap_content"
            android:layout_height="wrap_content"
            android:text="Cat"
            android:id="@+id/radioButton_cat"
            android:checked="false" />

        <RadioButton
            android:layout_width="wrap_content"
            android:layout_height="wrap_content"
            android:text="Cow"
            android:id="@+id/radioButton_cow"
            android:checked="false" />

    </RadioGroup>

    <Button
        android:layout_width="wrap_content"
        android:layout_height="wrap_content"
        android:text="Submit"
        android:id="@+id/button"
        android:layout_marginTop="25dp"
        android:layout_alignParentTop="true"
        android:layout_alignParentLeft="true"
        android:layout_alignParentStart="true" />
</RelativeLayout>
Step 4 – Finally write the following code in MainActivity.java file
com/example/programmingknowledge/thefirstapp/MainActivity.java
package com.example.programmingknowledge.thefirstapp;

import android.support.v7.app.ActionBarActivity;
import android.os.Bundle;
import android.view.Menu;
import android.view.MenuItem;
import android.view.View;
import android.widget.Button;
import android.widget.RadioButton;
import android.widget.RadioGroup;
import android.widget.Toast;

public class MainActivity extends ActionBarActivity {
     private static  RadioGroup radio_g;
     private static  RadioButton radio_b;
    private static Button button_sbm;
     @Override
    protected void onCreate(Bundle savedInstanceState) {
        super.onCreate(savedInstanceState);
        setContentView(R.layout.activity_main);
         onClickListenerButton();
    }

    public void onClickListenerButton() {
        radio_g = (RadioGroup)findViewById(R.id.rg_animals);
        button_sbm = (Button)findViewById(R.id.button);

        button_sbm.setOnClickListener(
                new View.OnClickListener() {
                    @Override
                    public void onClick(View v) {
                        int selected_id = radio_g.getCheckedRadioButtonId();
                        radio_b = (RadioButton)findViewById(selected_id);
                        Toast.makeText(MainActivity.this,
                                radio_b.getText().toString(),Toast.LENGTH_SHORT ).show();
                    }
                }
        );
    }

    @Override
    public boolean onCreateOptionsMenu(Menu menu) {
        // Inflate the menu; this adds items to the action bar if it is present.
        getMenuInflater().inflate(R.menu.menu_main, menu);
        return true;
    }

    @Override
    public boolean onOptionsItemSelected(MenuItem item) {
        // Handle action bar item clicks here. The action bar will
        // automatically handle clicks on the Home/Up button, so long
        // as you specify a parent activity in AndroidManifest.xml.
        int id = item.getItemId();

        //noinspection SimplifiableIfStatement
        if (id == R.id.action_settings) {
            return true;
        }

        return super.onOptionsItemSelected(item);
    }
}
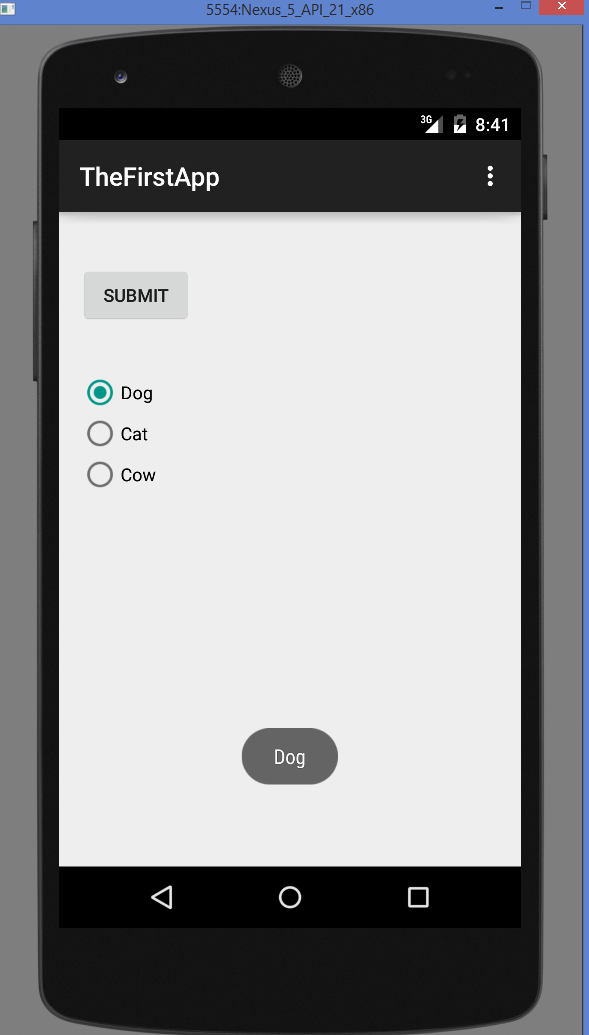
OUTPUT:
Android Books To Learn Mobile Apps Programming
- Android Programming: The Big Nerd Ranch Guide
- Android Design Patterns: Interaction Design Solutions for Developers
- Android Application Development Cookbook – Second Edition
- Android User Interface Design: Turning Ideas and Sketches into Beautifully Designed Apps (Usability)
- Android Recipes: A Problem-Solution Approach for Android 5.0
- Hello, Android: Introducing Google’s Mobile Development Platform (Pragmatic Programmers)
- Beginning Android Games
java.lang.NullPointerException: Attempt to invoke virtual method ‘int android.widget.RadioGroup.getCheckedRadioButtonId()’ on a null object reference