

In this tutorial we will learn How to use SeekBar in Android Using Android Studio.
A SeekBar is an extension of ProgressBar that adds a draggable thumb. The user can touch the thumb and drag left or right to set the current progress level or use the arrow keys. Placing focusable widgets to the left or right of a SeekBar is discouraged.
So lets create a project.
Step 1 – Create new Android project and name your project as SeekBarApp.
Step 2 – Add SeekBar and a textView in the main activity as shown in the picture below.
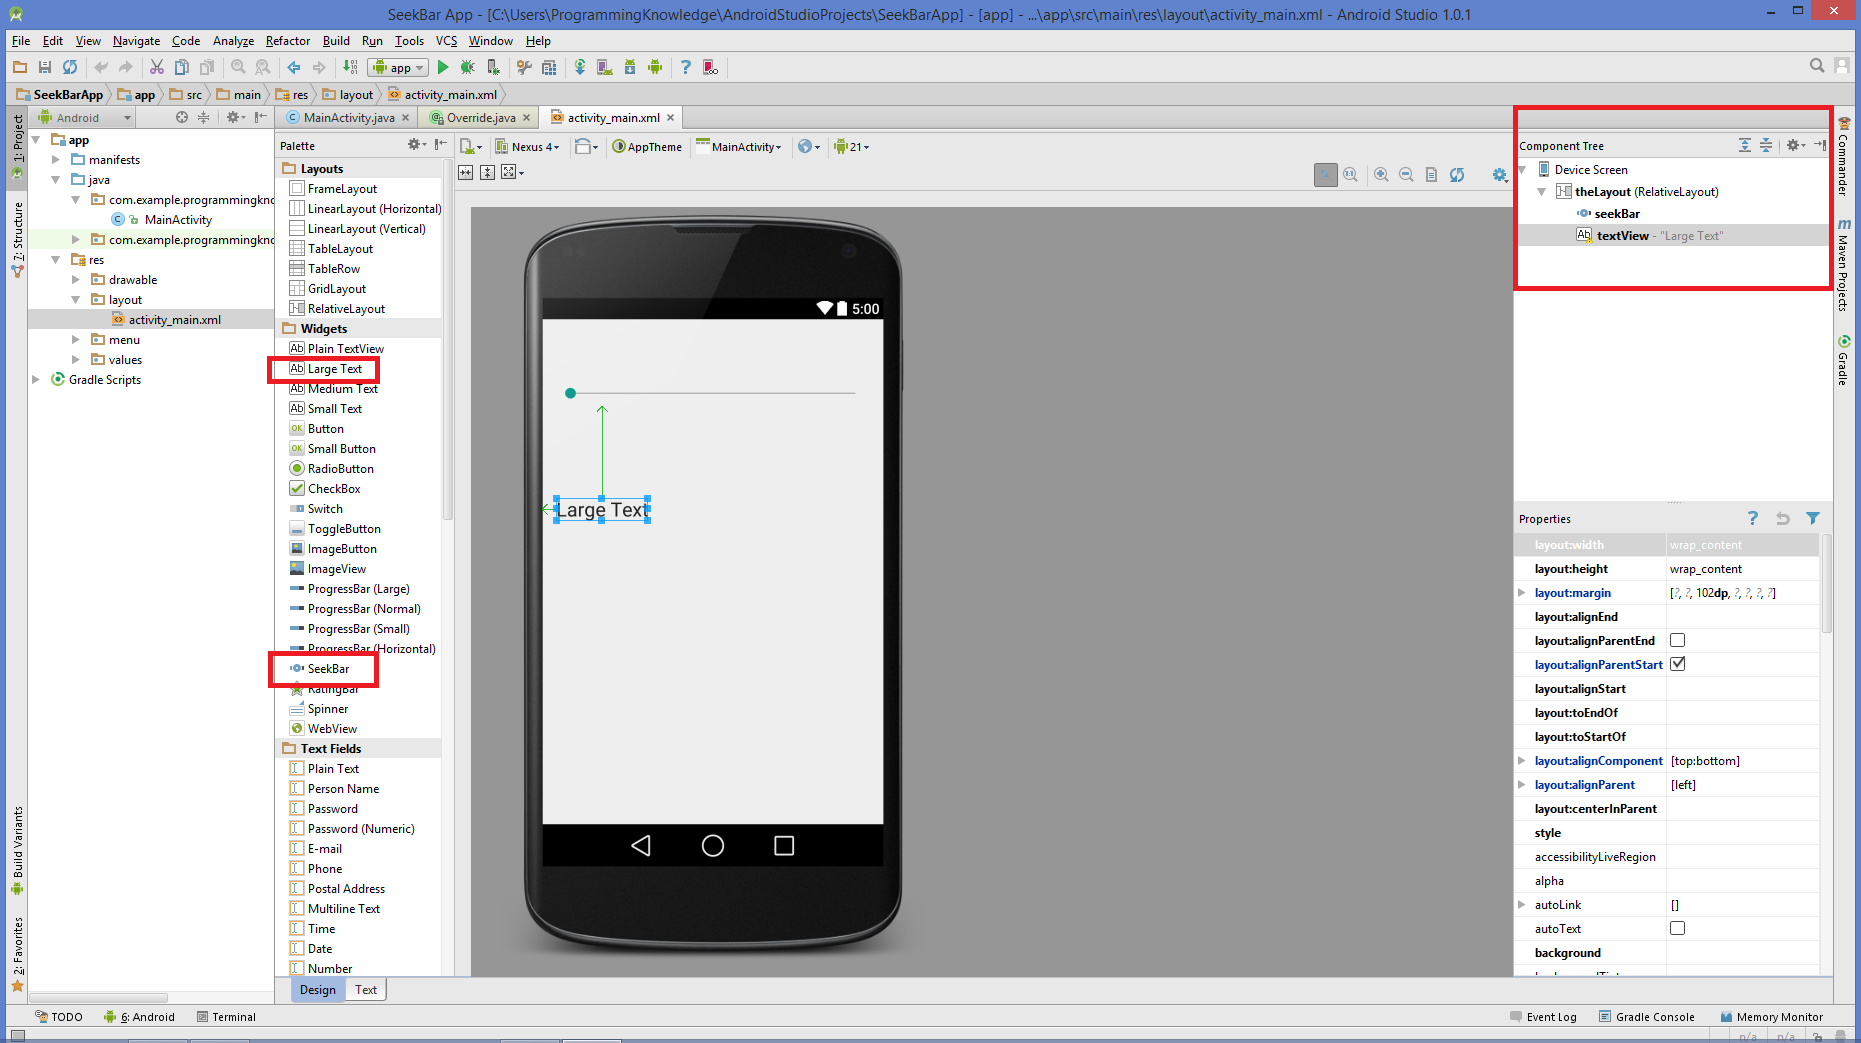
layout/activity_main.xml
<RelativeLayout xmlns:android="http://schemas.android.com/apk/res/android"
    xmlns:tools="http://schemas.android.com/tools" android:layout_width="match_parent"
    android:layout_height="match_parent" android:paddingLeft="@dimen/activity_horizontal_margin"
    android:paddingRight="@dimen/activity_horizontal_margin"
    android:paddingTop="@dimen/activity_vertical_margin"
    android:paddingBottom="@dimen/activity_vertical_margin" tools:context=".MainActivity"
    android:id="@+id/theLayout">

    <SeekBar
        android:layout_width="fill_parent"
        android:layout_height="wrap_content"
        android:id="@+id/seekBar"
        android:layout_alignParentTop="true"
        android:layout_alignParentLeft="true"
        android:layout_alignParentStart="true"
        android:layout_marginTop="51dp" />

    <TextView
        android:layout_width="wrap_content"
        android:layout_height="wrap_content"
        android:textAppearance="?android:attr/textAppearanceLarge"
        android:text="Large Text"
        android:id="@+id/textView"
        android:layout_below="@+id/seekBar"
        android:layout_alignParentLeft="true"
        android:layout_alignParentStart="true"
        android:layout_marginTop="102dp" />
</RelativeLayout>
/seekbarapp/MainActivity.java
package com.example.programmingknowledge.seekbarapp;

import android.support.v7.app.ActionBarActivity;
import android.os.Bundle;
import android.view.Menu;
import android.view.MenuItem;
import android.widget.SeekBar;
import android.widget.TextView;
import android.widget.Toast;


public class MainActivity extends ActionBarActivity {
    private static SeekBar seek_bar;
    private static TextView text_view;
    @Override
    protected void onCreate(Bundle savedInstanceState) {
        super.onCreate(savedInstanceState);
        setContentView(R.layout.activity_main);
        seebbarr( );
    }

    public void seebbarr( ){
        seek_bar = (SeekBar)findViewById(R.id.seekBar);
        text_view =(TextView)findViewById(R.id.textView);
        text_view.setText("Covered : " + seek_bar.getProgress() + " / " +seek_bar.getMax());

        seek_bar.setOnSeekBarChangeListener(
                new SeekBar.OnSeekBarChangeListener() {

                    int progress_value;
                    @Override
                    public void onProgressChanged(SeekBar seekBar, int progress, boolean fromUser) {
                        progress_value = progress;
                        text_view.setText("Covered : " + progress + " / " +seek_bar.getMax());
                        Toast.makeText(MainActivity.this,"SeekBar in progress",Toast.LENGTH_LONG).show();
                    }

                    @Override
                    public void onStartTrackingTouch(SeekBar seekBar) {
                        Toast.makeText(MainActivity.this,"SeekBar in StartTracking",Toast.LENGTH_LONG).show();
                    }

                    @Override
                    public void onStopTrackingTouch(SeekBar seekBar) {
                        text_view.setText("Covered : " + progress_value + " / " +seek_bar.getMax());
                        Toast.makeText(MainActivity.this,"SeekBar in StopTracking",Toast.LENGTH_LONG).show();
                    }
                }
        );

    }

    @Override
    public boolean onCreateOptionsMenu(Menu menu) {
        // Inflate the menu; this adds items to the action bar if it is present.
        getMenuInflater().inflate(R.menu.menu_main, menu);
        return true;
    }

    @Override
    public boolean onOptionsItemSelected(MenuItem item) {
        // Handle action bar item clicks here. The action bar will
        // automatically handle clicks on the Home/Up button, so long
        // as you specify a parent activity in AndroidManifest.xml.
        int id = item.getItemId();

        //noinspection SimplifiableIfStatement
        if (id == R.id.action_settings) {
            return true;
        }

        return super.onOptionsItemSelected(item);
    }
}
src/main/AndroidManifest.xml
<?xml version="1.0" encoding="utf-8"?>
<manifest xmlns:android="http://schemas.android.com/apk/res/android"
    package="com.example.programmingknowledge.seekbarapp" >

    <application
        android:allowBackup="true"
        android:icon="@drawable/ic_launcher"
        android:label="@string/app_name"
        android:theme="@style/AppTheme" >
        <activity
            android:name=".MainActivity"
            android:label="@string/app_name" >
            <intent-filter>
                <action android:name="android.intent.action.MAIN" />

                <category android:name="android.intent.category.LAUNCHER" />
            </intent-filter>
        </activity>
    </application>

</manifest>
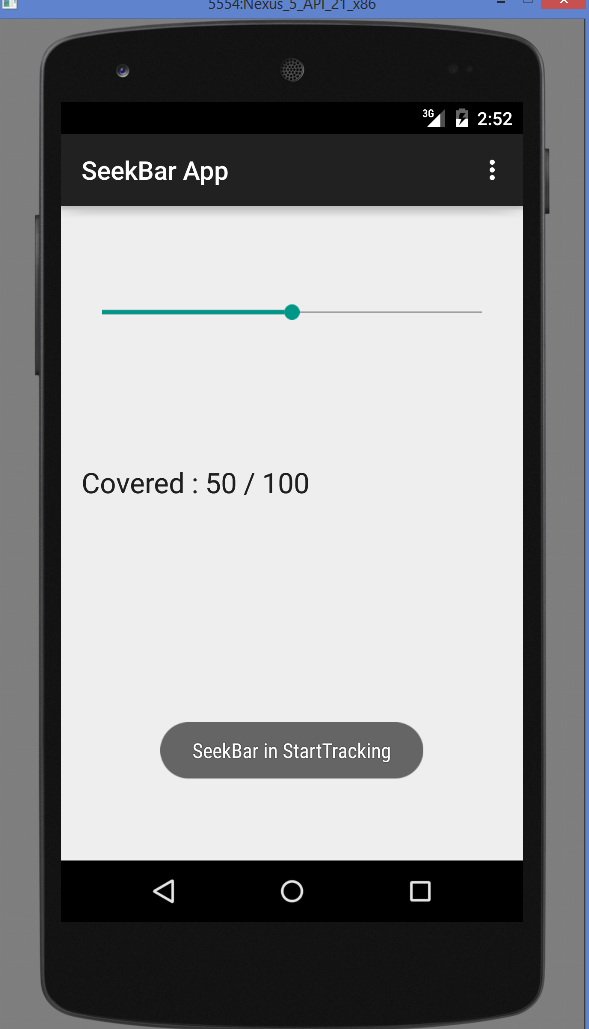
Output
Now run your project. And drag the seekbar. you will see the result in text view as shown below.
Click the button below to Download Source code
Dear Sir,
How to connect MS Sql server 2008?
Could you please share some example for mssql connection and insert, update, delete, view statement.