
In this post on Arduino Tutorial For Beginners, this topic about how to use Arduino to receive data from standard keyboard (101-, 102- , 104-) via PS2 cable type or USB type. But they are as same as each other so in this topic we only discuss about PS2 type, i will talk about USB type a little bit. If you want to build an external module instead of using Arduino directly, read this.
The PS/2 port is a 6-pin mini-DIN connector used for connecting keyboards and mice to a PC compatible computer system. Its name comes from the IBM Personal System/2 series of personal computers, with which it was introduced in 1987. Although it has 6 pins but we only use 4/6pins: +5V, GND, Data and Clk.
Look at the picture below to know the keyboard frame transfer. Assume when we press any keys on keyboard the keyboard will transfer a data packet . Each data packet consists of 11 bits. These are 1 start bit (a), 8 data bits, parity and stop bit (b) as the picture.
The keyboard will pull the clock pin from HIGH to LOW (>100us) for ready to start , then send 8 data bits and then parity and stop bit.

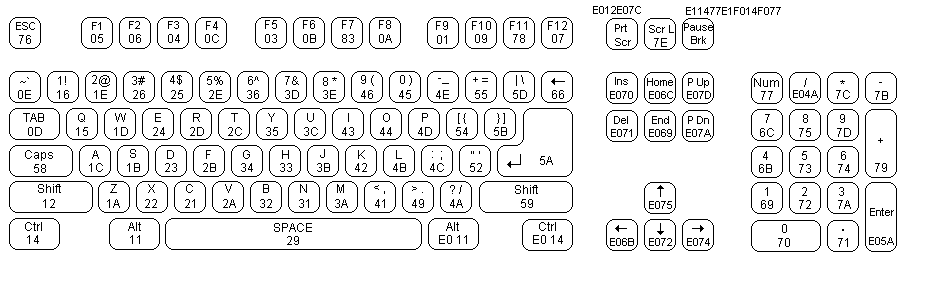
Is it simple, right?. Below is some HEX data will be transferred when press the keyboard. On Arduino we have to decompose those signal and then compare with the default keyboard scan code table.
These signals are very fast so simple pooling pin state would be too slow and we could be lost some data. Because of this, we use external interrupt (INT1) on Arduino for clock falling edge detection and readout of key data. We can use INT1 or INT0 but in the PS2 library they use INT1 , so we only use INT1 to commute with the keyboard, you can change it to INT0 if you want. This is the library, please download ‘PS2Keyboard002.zip’ because that is the standard library, I’m not sure the other library can work properly. Below is INT1 pin on Arduino
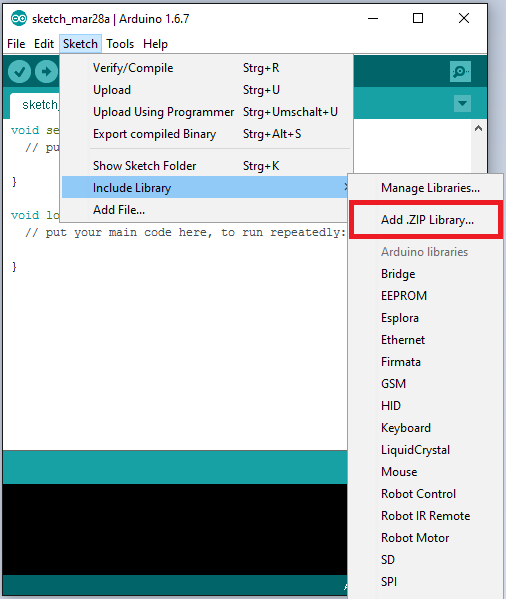
After downloaded the library, we also add it to Arduino IDE as the picture below via ‘Add. ZIP library’ and browse to the directory which you had just downloaded the PS2 library.
Next, to run this library on new Arduino IDE version, we need to edit some code insde PS2Keyboard.cpp, follow the instruction.
Go to the Arduino library directory, which contain all user library downloading from the internet. The directory normally is: ‘ThisPC/Documents/Arduino/libraries/’ access to the PS2Keyboard folder and open ‘PS2Keyboard.cpp’ file, edit code as the picture below
Okay, now let’s connect PS2 cable to Arduino as the diagram below
Copy and paste below code then enjoy the project:
#include PS2Keyboard mykb;

void setup()

{

mykb.begin(4); //Data pin

Serial.begin(9600); //Init Serial Monitor with baud = 9600

}

void loop()

{

if(mykb.available())

{

byte datarecei = mykb.read(); // Save receive data

Serial.println(dataracei,HEX); // Print to SerialMonitor data receive as HEX

}

}
The USB type is as the same as the PS2 type, below is USB type pinout, keep the old code and connect the USB type to Arduino and enjoy the project.
Leave a Reply