

In this post on Arduino Tutorial For Beginners, this topic about how to use module RFID RC522 with Arduino UNO R3. With this simple tutorial, we can apply this application to control the huge things in our life. E.g: Door lock, box lock , motorbike lock, student check-in,… this is an example about how to create a box lock using RFID RC522: How to Make an RFID Arduino Lock | Arduino RFID Lock Tutorial
The picture below is the module which i will use in this article and also in the video above, this module help us read RF tag or RF card when we put them near the module, it operate at 13.56Mhz, the module is quite stable and cheap for beginner who want to create DIY projects. This module support 3 protocol to communicate with Arduino, those are UART , I2C and SPI, but i will use the SPI because almost the Arduino community use this. This is the RFID library using SPI : https://github.com/miguelbalboa/rfid

After downloaded RFID library as .ZIP file from github, we will follow below picture and then browse to the .ZIP file, select and add to Arduino IDE.
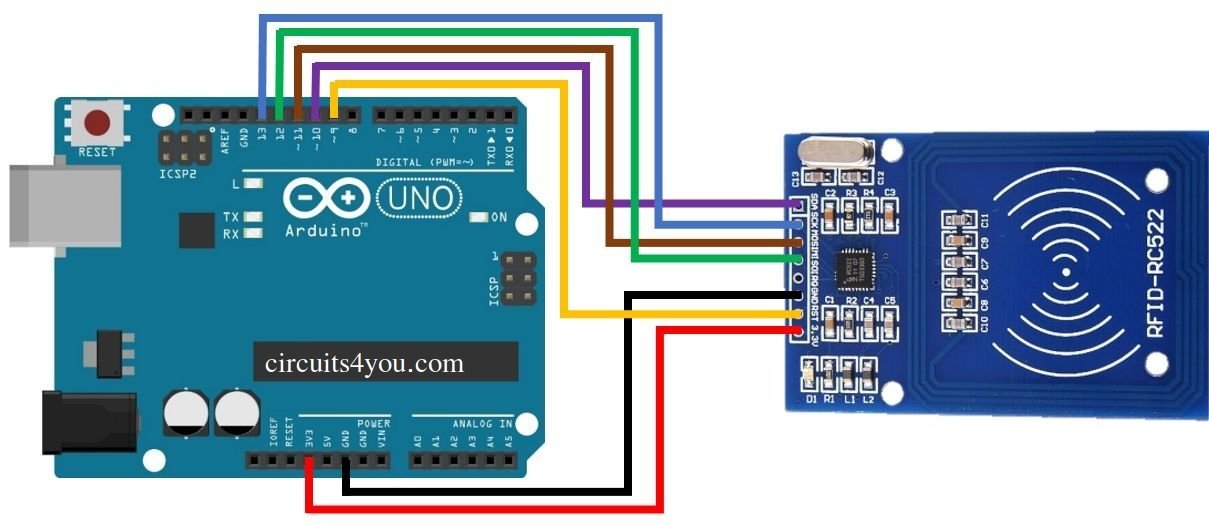
Next, we will connect module RFID as the diagram below
——————
–RFID—|ARDUINO|
—3V3—|–3V3–|
—GND—|–GND–|
—RST—|–09—|
-SDA(SS)-|–10—|
–MOSI—|–11—|
–MISO—|–12—|
—SCK—|–13—|
—————–
Okay, now let’s check our RFID module still working or not by an example “firmware_check” in default RFID library. If you can see your information RFID module as the video, your module is still good.
If your RFID module still working. Next, we will read the RF card information from example “rfid_default_key” to prepare to control our devices (led,servo,…).
After uploaded “rfid_default_key” project to Arduino, when we put the RF card near the RFID module, Arduino will print RF card information to Serial Monitor as the picture below, we just care first 4 bytes or 5 bytes which are card address, we can use them to identify cards.
Use the url below to convert HEX to DECIMAL, and the ADDRESS of the redbox after converted is “103 235 225 052”, but remember REMOVE SPACE AND DIGIT “0” if the ADDRESS has 2 digits. https://www.branah.com/ascii-converter
Now, let’s connect a led to Arduino as the picture below and move to code section 😀
#### This is code of this article, Please copy, change your CARD ADDRESS and paste to your project. Upload and enjoy ####
#include <MFRC522.h>

#include <SPI.h>

#define RST_PIN 9 // Configurable, see typical pin layout above

#define SS_PIN 10 // Configurable, see typical pin layout above

String mydecrfidcard = ""; // String to save CARD ADDRESS (4-5bytes converted from HEX)

MFRC522 mfrc522(SS_PIN, RST_PIN); // Create MFRC522 instance.

// Number of known default keys (hard-coded)

// NOTE: Synchronize the NR_KNOWN_KEYS define with the defaultKeys[] array

#define NR_KNOWN_KEYS 8

// Known keys, see: https://code.google.com/p/mfcuk/wiki/MifareClassicDefaultKeys

byte knownKeys[NR_KNOWN_KEYS][MFRC522::MF_KEY_SIZE] = {

{0xff, 0xff, 0xff, 0xff, 0xff, 0xff}, // FF FF FF FF FF FF = factory default

{0xa0, 0xa1, 0xa2, 0xa3, 0xa4, 0xa5}, // A0 A1 A2 A3 A4 A5

{0xb0, 0xb1, 0xb2, 0xb3, 0xb4, 0xb5}, // B0 B1 B2 B3 B4 B5

{0x4d, 0x3a, 0x99, 0xc3, 0x51, 0xdd}, // 4D 3A 99 C3 51 DD

{0x1a, 0x98, 0x2c, 0x7e, 0x45, 0x9a}, // 1A 98 2C 7E 45 9A

{0xd3, 0xf7, 0xd3, 0xf7, 0xd3, 0xf7}, // D3 F7 D3 F7 D3 F7

{0xaa, 0xbb, 0xcc, 0xdd, 0xee, 0xff}, // AA BB CC DD EE FF

{0x00, 0x00, 0x00, 0x00, 0x00, 0x00} // 00 00 00 00 00 00

};

// Initialize

void setup() {

digitalWrite(7,OUTPUT); // Set pin 7 is OUTPUT

Serial.begin(9600); // Initialize serial communications with the PC

while (!Serial); // Do nothing if no serial port is opened (added for Arduinos based on ATMEGA32U4)

SPI.begin(); // Init SPI bus

mfrc522.PCD_Init(); // Init MFRC522 card

Serial.println(F("Try the most used default keys to print block 0 of a MIFARE PICC."));

}

//Helper routine to dump a byte array as hex values to Serial.

void dump_byte_array(byte *buffer, byte bufferSize) {

for (byte i = 0; i < bufferSize; i++) {

Serial.print(buffer[i] < 0x10 ? " 0" : " ");

Serial.print(buffer[i], HEX);

mydecrfidcard += buffer[i];

}

}

/*

* Try using the PICC (the tag/card) with the given key to access block 0.

* On success, it will show the key details, and dump the block data on Serial.

*

* @return true when the given key worked, false otherwise.

*/

bool try_key(MFRC522::MIFARE_Key *key)

{

bool result = false;

byte buffer[18];

byte block = 0;

MFRC522::StatusCode status;

// Serial.println(F("Authenticating using key A..."));

status = mfrc522.PCD_Authenticate(MFRC522::PICC_CMD_MF_AUTH_KEY_A, block, key, &(mfrc522.uid));

if (status != MFRC522::STATUS_OK) {

// Serial.print(F("PCD_Authenticate() failed: "));

// Serial.println(mfrc522.GetStatusCodeName(status));

return false;

}

// Read block

byte byteCount = sizeof(buffer);

status = mfrc522.MIFARE_Read(block, buffer, &byteCount);

if (status != MFRC522::STATUS_OK) {

// Serial.print(F("MIFARE_Read() failed: "));

// Serial.println(mfrc522.GetStatusCodeName(status));

}

else {

// Successful read

result = true;

Serial.print(F("Success with key:"));

dump_byte_array((*key).keyByte, MFRC522::MF_KEY_SIZE);

Serial.println();

// Dump block data

Serial.print(F("Block ")); Serial.print(block); Serial.print(F(":"));

dump_byte_array(buffer, 16);

Serial.println();

}

Serial.println();

mfrc522.PICC_HaltA(); // Halt PICC

mfrc522.PCD_StopCrypto1(); // Stop encryption on PCD

return result;

}

//Main loop.

void loop() {

// Reset the loop if no new card present on the sensor/reader. This saves the entire process when idle.

if ( ! mfrc522.PICC_IsNewCardPresent())

return;

// Select one of the cards

if ( ! mfrc522.PICC_ReadCardSerial())

return;

// Show some details of the PICC (that is: the tag/card)

Serial.print(F("Card UID:"));

dump_byte_array(mfrc522.uid.uidByte, mfrc522.uid.size);

if(mydecrfidcard == "10323522552")

/* Don't put any SPACE, if your address include a number only 2 digits, remove the zero before.

* You need to convert your CARD address from HEX to DEC and put to the condition, "10323522552" is my example as the video

*/

{

digitalWrite(7,HIGH);

}

else

{

digitalWrite(7,LOW);

}

Serial.println();

Serial.print(F("PICC type: "));

MFRC522::PICC_Type piccType = mfrc522.PICC_GetType(mfrc522.uid.sak);

Serial.println(mfrc522.PICC_GetTypeName(piccType));

// Try the known default keys

MFRC522::MIFARE_Key key;

for (byte k = 0; k < NR_KNOWN_KEYS; k++) {

// Copy the known key into the MIFARE_Key structure

for (byte i = 0; i < MFRC522::MF_KEY_SIZE; i++) {

key.keyByte[i] = knownKeys[k][i];

}

// Try the key

if (try_key(&key)) {

// Found and reported on the key and block,

// no need to try other keys for this PICC

break;

}

// http://arduino.stackexchange.com/a/14316

if ( ! mfrc522.PICC_IsNewCardPresent())

break;

if ( ! mfrc522.PICC_ReadCardSerial())

break;

}

mydecrfidcard = ""; // RESET the String

}
Leave a Reply